
The Client and Contact Notes Assigned to Me pane in your Dashboard displays a condensed view of notes for the clients and the contacts who may require your attention or reaction.
Before you can use the Client and Contact Notes Assigned to Me pane, you must add it to your Dashboard. See Adding, Moving, or Removing Panes in Your Dashboard to learn how.
Reviewing the Pane Contents
Sections
Notes are organized on cards in the following sections:
| Section | Notes... | Sorted By... |
|---|---|---|
| Needs action | Include a due date but are not complete |
|
| General notes | Do not include a due date |
|
| Action completed | Include a due date and are marked complete | Completed date beginning with the most recent date |
You can do the following to display or hide cards in each section:
- Click More to show additional note cards in a section.
- Collapse a section that you are not interested in viewing.
Card Details
Note cards can contain the following details:
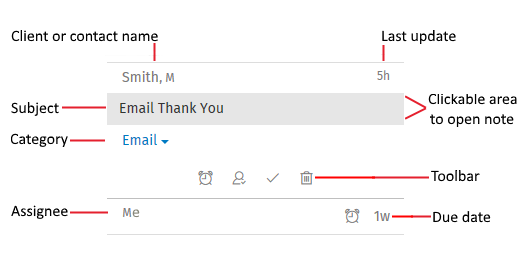
Card Actions
- Open a note. Click the subject area to review, edit, or delete a note.
- Change the category. Select a different value to change the note category. Categories are defined for the firm in Lists > General Lists > Notes Categories.
- Use the toolbar. The toolbar displays if you have rights to edit the note. You can use the toolbar to do the following:
-
Button Description Edit due date 
Select a different due date or remove the due date. Mark complete 
Mark a note complete. Mark incomplete 
Change the status of a completed note to incomplete. Change staff or assignment 
The action depends on the presence of a due date.
- Staff. If there is no due date and no action is required, change the staff name to the person most familiar with or interested in the details described in the note.
- Assign to. If there is a due date, change the staff responsible for completing the action described in the note.
Delete note 
Delete a note.
Managing Note Detail
Use the following steps to add, edit, or delete notes.
Adding and Editing
- Do one of the following:
- Add a note. Click
 at the top of the Client and Contact Notes Assigned to Me pane.
 - Edit a note. Click the note subject area on a card.
- Add a note. Click
- Do the following, as needed:
- Client/Client contact. Do the following to choose a client name or contact name:
- If you are adding a note for a contact, first select Client Contact.
- Begin entering the client ID, client sort name, or contact last name. As you type, a list of matching clients or contacts displays.
- Select the client or contact and press Enter. You can also scroll or use the keyboard arrow keys to find a client in the list.
- After a note is saved, you cannot change the Client selection to Client Contact or vice versa.
- Category. Select a category. Categories are defined for the firm in Lists > General Lists > Notes Categories.
- Date. Accept the current date or click
 and select a different note date. This date can be for any activity. Keep in mind that the dates for when the note was created, last edited, and completed are automatically recorded and display at the bottom of an open note.
 - Due date. Do any of the following:
- Select Today, Tomorrow, or In one week from the list.
- Click
 and select a date when an action is expected to be done.
 - Clear the due date. The card for this note will then be grouped in the General Notes section on the Client and Contact Notes Assigned to Me pane for the selected client.
- Subject. Enter a note subject. The subject displays on the note card; the note body does not. Consider a subject that allows you and other staff to identify the purpose of the note from the Client and Contact Notes Assigned to Me pane.
- Note. Enter the note text, which can be any information about the client or details that require action or follow up.
- Staff/Assign to. If there is no due date and no action is required, the field name is Staff. Enter your name or the name of the staff that is most familiar with or interested in the details described in the note.
- If the note has an assigned due date, the field name is Assign to. You must select the staff responsible for completing the action described in the note.
- Begin entering the staff name. As you type, a list of matching staff displays.
- Select the staff and press Enter. You can also scroll or use the keyboard arrow keys to find staff in the list.
- Complete. Select Complete if all note related tasks are done. The card for this note will then be grouped in the Action Completed section on the Client and Contact Notes Assigned to Me pane for the selected client.
- Client/Client contact. Do the following to choose a client name or contact name:
- Click to save the note.
Deleting
To delete a note, click on the card toolbar or at the top of an open note, and then click Delete to permanently remove the note.